Welcome To RamReddyTech Blog
Dear Friends,
Thanks for Visiting my Blog, Please Enjoy Download and Listening to yourFavorite Songs and you find all intresting and cool stuff...If you want to Download any Special Song or any one which is not in the list of this Blog, then please send your Request to me at ramreddy.blog@gmail.com.
Enjoy Your Stay !
Ram Reddy
Thanks for Visiting my Blog, Please Enjoy Download and Listening to yourFavorite Songs and you find all intresting and cool stuff...If you want to Download any Special Song or any one which is not in the list of this Blog, then please send your Request to me at ramreddy.blog@gmail.com.
Enjoy Your Stay !
Ram Reddy
Showing posts with label computer Tips And Tricks. Show all posts
Saturday, 10 December 2011
Monday, 28 November 2011
How To Assemble A PC – Step-By-Step Video Tutorial
What to know how to assemble a desktop computer? Then this video will teach you everything all you want to know. This video will help you to begin from scratch and give step by step instructions so that you can easily understand various components of Pc and how to assemble it.
This video is a for beginner level. And it covers various CPU components and how to assemble them. You can have basic knowledge about the hardware watching this video Hw would have explained everything clearly here.
Saturday, 26 November 2011
How To Hide Partitions Without Using Any Software
Here is a very cool and simple trick to hide any partition of our hard drive on computer.
Many times we will think of hiding some confidential data form others.
I have shown two easy methods to hide partitions without using any software.
Hide Partitions Using Command Prompt
1. Go to Start–>Run.
2. Type Diskpart and press Enter.
3. In the console type List volume to see all the drives available on your PC.
4. Now select the drive which you want to hide.
Note:
Here I have shown how to hide E drive.
5. In My PC it is volume 2 for drive E .
6. Now to hide drive E type Select volume 2 .
7. Then type remove letter e , this will hide your drive.
8. Now to get your drive back type Select volume 2 and then type assign letter e.
Hide Partitions Using Computer Management
1. Right click My Computer.
2. Click Manage or press letter G.
3. This will open Computer Management.
4. Under Storage, select Disk Management.
5. Right click on the drive which you wish to hide.
6. Select Change drive letters and paths...
7. Click Remove
8. Now can find your partition will be hidden.
9. To get back the partition Computer Management–>Select drive–> Change drive letters and paths
10. Now select Add option.
11. In that Assign the following drive letter.
12. Select ok.
Trick To Hide Text In Notepad
A Superb Trick To Hide Text In Notepad
Here is a small trick to hide text inside your windows default text editor
i.e Notepad using command prompt, :)
but this trick works only on NTFS file system.
Steps to hide text in a Notepad
1. Open your command prompt Start–>Run and Type cmd
2. Type cd.. to move to C:\> drive or Type cd desktop to move to your desktop.
3. Type the below code in your command prompt
notepad filename.txt:hidden
4. Write some data and save(Ctrl+S) the file.
5. Browse to the file location and Open filename.txt you cannot see any data in the file.
6. To retrieve the hidden data open command prompt and type the same command.
notepad filename.txt:hidden
Tuesday, 15 November 2011
Unlocking hawei modem for free
This post is about another crack/Hack . Today im going to write about simple,100% free , and fast method to unlock huawei HSDPA (3G,3.5G) dongles/Modems.
I think you know the meaning of locked dongles.
That means that dongles locked for using one career which you bought the modem from.
Use This To Generate Your Unlocking Code
Click Here
After obtaining your code download this simple software
To enter the unlock code to your HSPA modem-
Download
Then run it...
#Click detect and select your modem from list then click accept.
#Then click Unlock Modem and enter your 8 digit unlock code that you got from the Above Link
Then click ok.
Whopas Its done.
You can use this feature for unlock these huawei modems
Huawei E1152
Huawei E1550
Huawei E1550 Kyivstar
Huawei E1552
Huawei E1553
Huawei E156 / E156B / E156C / E156G
Huawei E160 / E160G / E160X
Huawei E161
Huawei E1612
Huawei E1630
Huawei E166 / E166G
Huawei E169 / E169G
Huawei E170
Huawei E172
Huawei E1750
Huawei E1752
Huawei E1756
Huawei E176
Huawei E1762
Huawei E180
Huawei E1820
How to Lock Your Computer Using Mouse
Today lets see a simple trick on how to lock your PC using mouse click.We normally use Alt+Ctrl+Del or Windows+L to lock our PCs.Instead of trying those windows keyboard shortcut keys to lock Pc, lets now tryout something new
.Some might have already know this trick already…
1. Just Right click on the desktop, point to New and click Shortcut.
2. In the Create Shortcut dialog box, copy the following into the ‘Type the location’ of the item text box:
“rundll32 user32.dll,LockWorkStation” remove quotes while typing.
3. Click Next.
4. In “Type a name for this shortcut”, type LOCK MY PC and Click Finish
5. Now just double click on the icon, your desktop will be locked.
Though this is a age old trick.It makes some difference to newbies
How To Clean your RAM using Notepad
Many friends of me ask where can I download a software which can keep my RAM free? And I found these software are nothing but using some lines of code which can be implemented by using notepad or any editor tool. So if any one does not have any software, you can use it by doing the following things which I am going to mention.
Steps to Clean Your RAM Using Notepad:
Step 1: Open Notepad
Step 2: Type FreeMem=Space(10240000000)
Step 3: Save it as “CLEANER.VBS” in any location you like.
Step 4: You can edit the code and write 512 instead of 1024 if you own a 512mb RAM or change to anything you like.
Step 5: Run it !
After this final step your RAM will be free.
Hope you enjoyed it.
Please Pass comments on it..
Saturday, 5 November 2011
Customize Your ‘Send To’ Right-Click Windows Menu
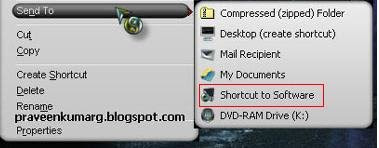
If you’re like me, you frequently need to move the same types of files to the same places over and over again. While you could keep a shortcut pointing to that location on your Desktop, there’s an even easier (and more flexible) way to quickly move files to a favorite place. The secret lies in the “Send To”command found in your right-click contextual menu.
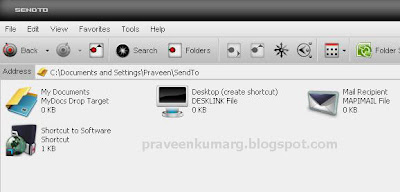
One of the unadvertised features of ‘Send To’ is that you can directly change the items that show up in thelist. This is done by going to a specific folder and changing its contents. That folder is found in“Documents and Settings/yourusername.” Note: replace “yourusername” with whatever your user account name is on your computer. Here’s what mine looks like.
Notice that the Send To folder is somewhat transparent, indicating it is a hidden folder. If your hiddenfolders are not visible, go into “Tools–>Folder Options–>View (Tab)
–>Show Hidden Folders.” Once you have done this you are ready to go into your Send To folder.
In the folder, you will see all of the items that show up in the drop down. Most of these are actually shortcuts to those places, though a few are drives, commands to zip, or special system shortcuts to places like the Desktop or ‘My Documents’. Because they’re shortcuts, any other shortcuts you place in this folder will also show up in your Send To drop down.
–>Show Hidden Folders.” Once you have done this you are ready to go into your Send To folder.
In the folder, you will see all of the items that show up in the drop down. Most of these are actually shortcuts to those places, though a few are drives, commands to zip, or special system shortcuts to places like the Desktop or ‘My Documents’. Because they’re shortcuts, any other shortcuts you place in this folder will also show up in your Send To drop down.

Now create a Shortcut for any Folder which you wish to add it in Send to item.
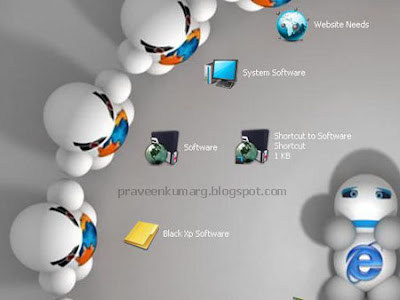
In the Above ScreenShot i have Created a shortcut for Software Folder.Now just Copy/cut the created Shortcut to c:\Documents and Settings\Username\SendTo as Shown in below screenshot.

That’s it!!!.

We have Customized the Send To Rightclick Windows Menu..
Add Background Wallpaper On Your Pendrive
Today I saw How to Place Background Picture for your Pendrive in Orkut Forums.It’s Very Simple.See I have Placed a Background Picture of my Friends for my Pendrive.I would like to share this With you..
Just Copy the below code to notepad,then save it as “desktop.ini”
[.ShellClassInfo]
IconFile=%SystemRoot%\system32\SHELL32.dll
IconIndex=127
ConfirmFileOp=0
[{BE098140-A513-11D0-A3A4-00C04FD706EC}]IconFile=%SystemRoot%\system32\SHELL32.dll
IconIndex=127
ConfirmFileOp=0
Attributes=1
IconArea_Image=“YourPictureName.jpg”
IconArea_Text=”0xFFFFFF”
VeBRA sources – don’t delete the tag above, it’s there for XXXXX purposes -
[ExtShellFolderViews]
{BE098140-A513-11D0-A3A4-00C04FD706EC}={BE098140-A513-11D0-A3A4-00C04FD706EC}
{5984FFE0-28D4-11CF-AE66-08002B2E1262}={5984FFE0-28D4-11CF-AE66-08002B2E1262}
[{5984FFE0-28D4-11CF-AE66-08002B2E1262}]
PersistMoniker=Folder.htt
PersistMonikerPreview=%WebDir%\folder.bmp
PersistMoniker=Folder.htt
PersistMonikerPreview=%WebDir%\folder.bmp
1. Where “YourPictureName.jpg” is, delete that and replace with your picture name for example“superman.gif”
2. Put “desktop.ini” and your chosen picture in yourUSB Drive then Hidden it.
3. Refresh and Enjoy with your new background.
4.You can also try on C,D,E F drives
2. Put “desktop.ini” and your chosen picture in yourUSB Drive then Hidden it.
3. Refresh and Enjoy with your new background.
4.You can also try on C,D,E F drives
Make shortcut for locking your desktop and keyboard
Sometimes you need to move away from computer quick without shutting it down. But there are people near you don't trust. How to keep them not to touch your computer? Lock it. OK, but how to do that quick? Well, you'll do that if you have a shortcut on desktop for looking your computer desktop and keyboard. Just double-click on shortcut. And here's how you'll make that shortcut.
Right-click on desktop.
Take "New > Shortcut".
"Create Shortcut Wizard" opened.
In text field, type: "rundll32.exe user32.dll,LockWorkStation".
Next.
Name your shortcut as you like.
Finish.
Now, you have a shortcut for locking your desktop and keyboard. Here's how you'll change it's icon:
Right-click on shortcut.
Chose "Properties".
Click on "Shortcut" card.
Click "Change Icon".
In "Look for icons in this file" field, type "Shell32.dll".
OK
Chose icon from list.
OK.
Right-click on desktop.
Take "New > Shortcut".
"Create Shortcut Wizard" opened.
In text field, type: "rundll32.exe user32.dll,LockWorkStation".
Next.
Name your shortcut as you like.
Finish.
Now, you have a shortcut for locking your desktop and keyboard. Here's how you'll change it's icon:
Right-click on shortcut.
Chose "Properties".
Click on "Shortcut" card.
Click "Change Icon".
In "Look for icons in this file" field, type "Shell32.dll".
OK
Chose icon from list.
OK.
Friday, 4 November 2011
A Small Trick To Create Invisible Folder
Oka Secret Folder ni Create cheyalante em chestam...?
Folder ni Hide chestam, Malli Chudalante Tools->Folb\der Options->View lo ki velli SHOW HIDDEN FOLDERS Ani Chestam (OR) Folder Lock Softwares Install Chestam.
Miku Oka Manchi Trick Cheppana???
Adi Entante Folder Akkade untadi But Kanabadadu and click cheste matram open avtadi.
Elago cheppana??
*First oka new folder create cheskondi.
*Tarvatha dani mida right click chesi renam select chesi name antha delete cheyandi.
*Tarvatha ALT pattukuni 0160 number type chesi alt ni vadilesi pakkana ekkadaina mouse tho click cheyandi.
*Ippudu mee folder ki name undadu.
*Tarvatha Aa folder mida right click chesi PROPERTIES-> CUSTOMIZE->CHANGE ICON loki vellandi
*tarvatha andulo odifferent different icons untai andulo nundi oka empty icon ni select cheskondi
Adi exact ga LOCK and SEARCH Icons madyalo untadi. em kanabadadu kani select cheste matram select avtadi.
*ippudu adi select cheskunnaka OK Press cheyandi..
Thats is...! Folder mayam aipotadi.
Adi ekkadundo chudalante refresh kodithe blink avtadi
Screen Shots::
Wednesday, 2 November 2011
How to Use Sony Cybershot Digital Camera As a Webcam
If you have a Sony Cybershot and the right connections on your computer, you may be able to use the digital camera as a webcam as well. Webcams are great for videoconferencing, both for business and for pleasure. Using your Sony digital camera as a webcam will save you money from needing to purchase an additional device, and would have the side benefit of reducing clutter on your desk. The process will take only about 5 to 10 minutes to complete.
Things You'll Need
- Sony Cybershot
- Camera power adapter
- Analog video jack on your PC
- Analog video cable
1.Plug the AC adapter into the camera, and the adapter into a power outlet. The webcam functionality will not work on the camera batteries.
2.Attach a video cable from the camera's "Video Out" jack to the analog video jack on your PC. Power up your digital camera, ensuring its set to the camera function (typically a picture of a camera on the selection dial).
3.Turn the PC on and load an application requiring the webcam. Enter the video settings for that application.
4.Choose the "Video In" option within the application. If the camera has been connected properly and is powered on, you should see an image (yourself if the camera's pointed at you). Click "OK" to save these settings.
5.Ask a friend to help you test out the webcam functionality by starting a webcam chat with them. Ensure that the picture is being sent out properly. If so, you have completed the tutorial. Otherwise, check all settings.
Tips & Warnings
- Some cameras have an auto off function. Ensure this is turned off or the camera may shut off during a webcam chat.
- This setup will broadcast video only, unlike most webcams that broadcast both audio and video to the recipient. To send audio, you will have to set up a separate microphone.
How To Connect Through Webcam??
1.Check the manual of your digital camera to see if it can be used as a webcam. Many digital cameras have this functionality and even come with webcam software.
2.Install it. If you have a software CD that needs to be installed on the computer before using your digital camera as a webcam, install it now.
3.Connect your USB video source capturing device to your computer. Plug it in to the USB port of your computer. Beware, you need all your drivers installed into your computer otherwise it’s not going to work. Ensure that the device is properly positioned before inserting. If you encounter any resistance on inserting, remove and check the position again.
4.Plug it in. Grab all audio/video cables of the USB video source capturing device end and plug them in to the audio/video cables that come with the camera which are standard since most digital cameras come with them to connect your camera with the TV.
5.Plug in the jack of the audio/video cables right into your camera.
6.Go to my computer and click on the USB video source capturing device drive icon. This will show the video capturing on the camera.
7.Plug your digital camera's power adapter into the camera. Some won't function as a webcam unless they are plugged into A/C power as it requires too much power. Even if your digital camera functions as a webcam while on batteries, A/C power saves your batteries and prevents your camera from shutting off in the middle of a broadcast.
8.Turn your digital camera on. Put camera on video mode. You're ready to video chat.
9.Plug the microphone into the microphone jack of your sound card. Use a separate microphone if your digital camera doesn't transmit sound when used as a webcam.
10.Set up your camera as close to your monitor as possible. This allows better face to face communication.
11.Position yourself about 2 to 3 feet away from your digital camera. Most digital camera's focus best at this distance when used as a webcam.
12.Enjoy using your camera as a web cam.
**************************************************** What Is Analog Video Jack???
This Is The Analog Video Jack, Its Should Be Attached To your Computer
How to connect my Analog Video Camera?
You need to have an analog video capture device installed on your computer to capture video from an analog video camera or from a VCR. When an analog capture device is connected to an analog camera and is installed on a computer, it converts an analog video signal into a digital format that the computer can recognize.
Analog capture devices today are made in a variety of forms, such as a capture card that is installed on your computer, or as a USB dongle that you can connect to a USB port on your computer.
Analog capture card:

USB dongle:

After installing the analog capture device, you need to connect it to your analog video camera.
The most basic type of connection you can use to connect your analog video camera to the analog capture device is a composite video connection. This is one of the more popular connection methods because many analog video cameras and capture devices have composite video jacks.
To connect an analog video camera using a composite video connection remove the jack cover on your camera and locate the composite video jack (yellow), as well as the right-channel (red) and left-channel (white) RCA jacks.
Take an RCA video cable that has three RCA connectors (yellow, red, and white), and plug it into the corresponding jacks on the video camera.

Connect the composite video connector (which is yellow) to the composite video jack on your capture card or to the composite video jack (also yellow) on the USB capture dongle.

Plug the left-channel (white) and right-channel (red) RCA connectors into a "Y" stereo adapter with a pair of RCA-style, left-channel and right-channel connectors (male), and a single line-in, 1/8-inch (3.5 millimeter) mini connector. Plug the mini connector into the audio line in on your computer.

After you have installed your analog capture device and connected it to your computer, you are now ready to webcast.
Wednesday, 19 October 2011
Change Windows 7 Logon Screen
Everybody watches a default logon screen when they log on ...
Isn't is Boring !!
So I found a method to change the log on screen in windows 7.
Steps :-
* Fire up registry editor (Win Key + R and then type regedit, hit enter)
* Browse HKEY_CURRENT_USER\Software\Microsoft\Windows\CurrentVersion\Authentication\LogonUI\Background , double click on key named OEMBackground and change its value to 1 (If you cannot find the path or the key go ahead and create it, remember OEMBackground is a Dword)


Thavk for reading it!
Isn't is Boring !!
So I found a method to change the log on screen in windows 7.
Steps :-
* Fire up registry editor (Win Key + R and then type regedit, hit enter)
* Browse HKEY_CURRENT_USER\Software\Microsoft\Windows\CurrentVersion\Authentication\LogonUI\Background , double click on key named OEMBackground and change its value to 1 (If you cannot find the path or the key go ahead and create it, remember OEMBackground is a Dword)

- You just enabled the OEM Background functionality. Now browse to the folder
C:\WINDOWS\System32\oobe\info\backgrounds. Again the folder path may not exist already, so you can go ahead and create required folders (info and backgrounds are generally not present)

- Now put in any JPG file with size less than 256 kb in this folder and rename it to backgroundDefault.jpg. This file will be stretched to fit the screen, so you would want it to match the resolution of your screen so that image doesn’t look bad.
Thavk for reading it!
Tuesday, 18 October 2011
How To Hide Text In Notepad ??
This is a simple trick to hide text inside your windows default text editor i.e Notepad using command prompt, but this trick works only on NTFS file system.
Steps to hide text in a Notepad :
1. Open your command prompt Start–>Run and Type
cmd 2. Type cd.. to move to C:\> drive or Type cd desktop to move to your desktop 3. Type the below code in your command prompt
notepad filename.txt:hidden 4. Write some data and save (Ctrl+S) the file.
5. Browse to the file location and Open filename.txt you cannot see any data in the file.
6. To retrieve the hidden data open command prompt and type the same command. notepad filename.txt:hidden
Do you like this notepad trick ?
Block any Website in your Computer without any Software.[How To]
If you want to block certain websites on your computer without any software then this trick can be very helpful to you.You can block any number of websites and if blocked they cannot be opened in any browser like google chrome,firefox,opera and Internet explorer.
For this trick we will edit the host file of the windows and will use the Ip address 127.0.0.1 (i.e localhost).Whenever somebody will try to open the blocked website the user will be redirected to local host.Thistrick works in windows xp,vista and windows 7 .
Here is the Trick To Block Any Website On Your Computer
Open My Computer/Computer
Navigate to your Operating system drive (Usually C drive)
Now goto Windows –>System32–>drivers–>etc
Here you will see your Hosts file.Open this file with notepad.
Now move to the last line in this file and add the address of the website to be blocked prefixed by 127.0.0.1
For example In the screenshot below I have blocked facebook.com on my computer
01 sample hosts file Trick To Block Any Website On Your Computer Remember that you should insert the Url of the blocked website with and without www prefix as shown in the above screenshot
Now Save the file.
Note:-You should open notepad with administrative privileges otherwise you won,t be able to save it
***Clear the cookies and cache of the browser before trying to open the block site ***
USB/Pen drive write protection manually by registry editing
Things to note before doing this:
As the trick will write protect your pen drive, you will not be able to transfer anymore data until you disable it again (works best if you only wish to copy or read something from the drive).
You need Admin rights to work upon the registry editor.
Steps to make your drive Write Protected:
1. Open Registry Editor by typing regedit in Run dialog.
2. Navigate to the key HKEY_LOCAL_MACHINE\SYSTEM\CurrentControlSet\Control\
3. Find a sub key inside it named “StorageDevicePolicies”. If it does not exist there then we need to make it. Right click on “Control” key -> New -> Key. Name it “StorageDevicePolicies” without quotes.
4. Now right click on this newly created key and then click New -> DWORD value and name it as “WriteProtect”.
5. Modify this key and give it a value 1.
6. Click OK, and remember to restart the PC.
Now no more data can be transferred to the drive but to start using the drive again just give the “WriteProtect” key a value of 0 instead of 1 and restart the PC.
Reduce Electricity Consumption Of Windows PC
Usage of laptops has really increased in the last few years due to the compactness of the portable computers and the ease of carrying it. But, some of the factors may restrict the amount of usage of the laptops when the user is mobile. One of such factors is definitely the battery and the power which can be used while travelling. If the battery-life is low then it definitely affects the work of the user. So, one may try to reduce the power consumption, so that the battery can be used for a longer time when the laptop is not in plugged-in mode. So, for this today we are discussing a small utility which can help you in serving the purpose and will definitely reduce the amount of power that is consumed in a normal laptop.
KAR Energy Software is basically a small, easy to use, powerful and a freeware which has been specially developed for Windows and it allows the user to reduce the power consumption while using the desktop or laptop, thus providing the user with lot more hours of working even when the user is mobile. As we all know, PC or laptop is one of the power consuming devices and that too if not optimized for best usage. So, they need to be optimized and proper care needs to be taken in reducing the power consumption as much as possible. Now, here comes the usage of this smart tool as it automatically starts with Windows start up and optimizes the PC for power consumption. There are various factors which needs to be optimized if one is looking for the overall optimization of power consumption. Some of these factors include, the CPU cooling, reducing the frequency of the processor and also putting up the computer into standby or switch off the screen whenever it is not needed. All these things are handled and taken care by this single utility and thus improves the overall life and reduces the power-consumption in a laptop or PC.
Result after installing this software :

You may download this small utility from the link given below and after installing it you may explore its different features which helps you in improving the overall performance of the battery and thus of the laptop. You may experience at least 48% consumption reduction by using this tool. By doing so, it automatically accelerates the performance of the computer which improves the overall performance of the system. If we go into the inner working then we may see that it customizes the actual consumption of RAM and processor speed along with reducing the start-up time of the PC, thus it requires less power. It also lowers the temperature of the processor which in turn reduces the risk of hardware-failure.
We may also observe that it creates a new power plan which is set as the default one on laptop and thus according to this new plan all the configurations and settings such as screen-brightness, etc. are automatically set. So, overall we may say that it is a worthy tool and is able to manage the power consumption of the computer by controlling the frequency of the processor to the actual use made, thus improving the overall performance of the computer.

+copy.jpg)